How to read the guide
WordPress Administration Guide – Welcome to the WordPress (WP) user guide page. I am writing this guide based on my own and my clients’ experience and needs in managing a website and e-shop. The aim of the guide is probably not to get too technical and to describe what is needed. I hope you find what you need! If not, feel free to let me know what else you would like to write about. I’ll be updating this section regularly – so it’s worth returning to this page from time to time. The literature used is listed below – anyone can find more information if they wish.
Observations
- I have used the Estonian language WordPress to create this guide. For the sake of clarity, I will add English translations for the most important keywords.
- For the tutorial, I have created a sample e-shop using the Astra PRO theme, with Elementor PRO. The information provided is indicative and does not correspond to the truth.
- Depending on the WP version, the admin view may differ.
Entering the admin environment
Access the admin environment from https://www.domeeninimi.ee/wp-admin/
Castronym: Your email address
Password – User-defined password
If you’ve lost your password you can request a new one here: https: //domeenimi.ee/wp-login.php?action=lostpassword
Read also how to add a user
WordPress administration screen
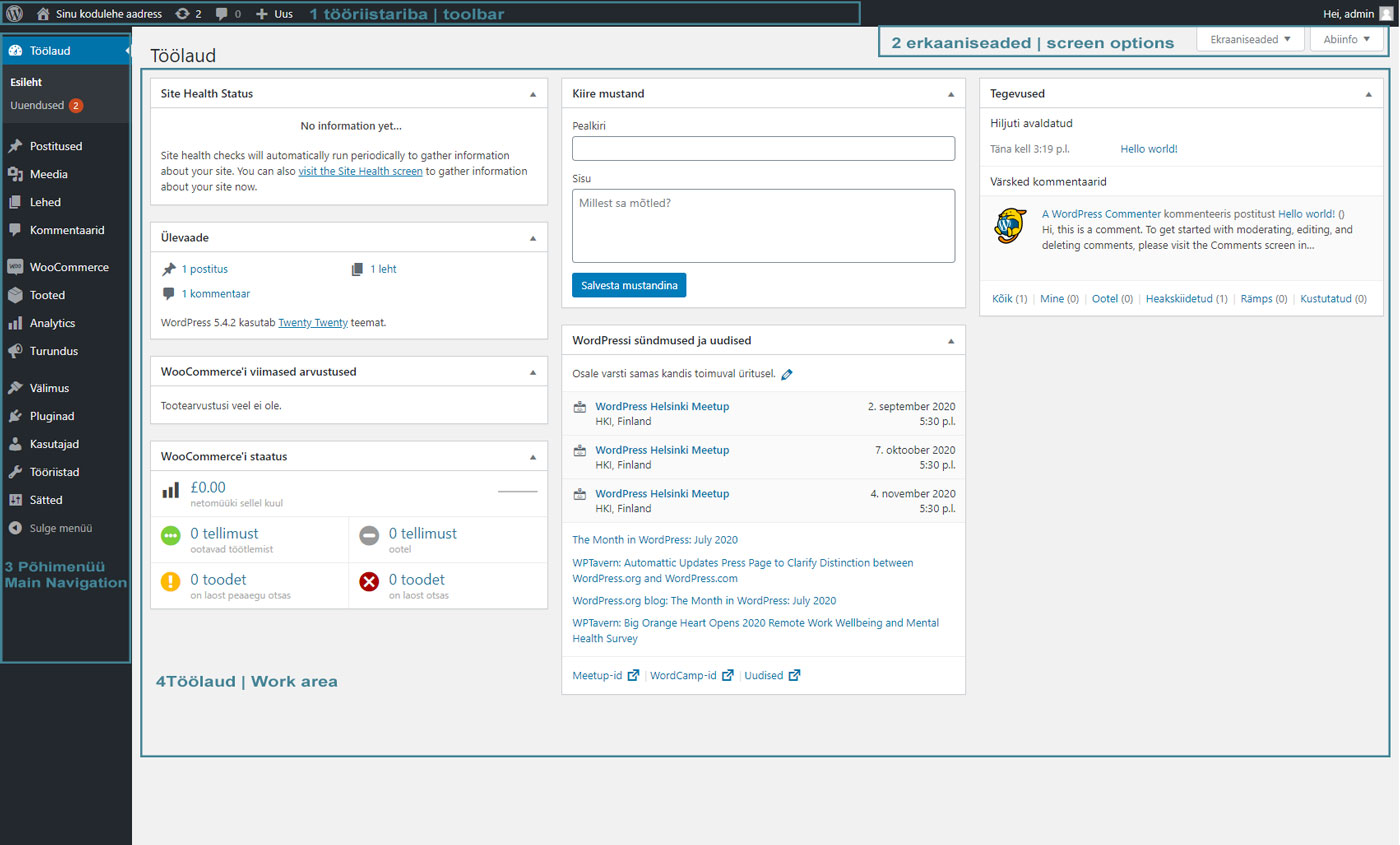
1 – The Tool bar contains links to various functions and is always displayed at the top of the page. The toolbar allows you to quickly add, for example, a new post, page, user, etc. Depending on the functionality of the homepage, the toolbars contain different information. It also provides access to the user account and the WordPress helpinfo.
Examples of toolbars on different pages-

2 – Screen Options appear on the right-hand side of the toolbar. On-screen menus allow the user to choose the information that is displayed. For example, on the posts page, it is possible to view and remove post categories from the view. Product categories on the product page, whether it is a featured product, etc. Depending on the applications you use, the display and non-display of columns may vary.
To expand the options available for a specific screen, click the ‘Screen options’ tab and tick or clear the boxes you want.
3 – In the Main Navigation menu, you can see the items that your user has been given the right to manage. (see User management). All the elements are listed in the main menu – the most important ones (they may vary according to the structure of each page).
- Pages – Pages that appear on the public side of the page (e.g. “Contact”, “Gallery”, etc.).
- Posts – Posts/news are part of the blog. They differ from newspapers mainly because they are in chronological order and usually group topics into similar categories.
- Media files – All uploaded files (images, pdf files, videos, etc.) can be found in the Media Strategist.
- Appearance – WP gives you quite a lot of options to change the layout of the page – assuming your webmaster has done the necessary configuration, it doesn’t change the management of the page and I won’t dwell on that.
- Appearance -> Menus – In the Menus section, you can manage the menus that are visible on the page. Depending on your design template, a page may have multiple menu locations and menus.
- Users – Managing the users of your website and their roles
Sheets
A Pages is a static single page of content that displays the content you need. More common content pages are for example “About” and “Contact”. Although WP saves the time and date when you add and edit a page, it does not display it on the public side.
Add a new page
Pages can be added from the toolbar as well as from the main menu as a quick menu item
Title – the title is the name of the page, and later, by default, the name of the menu. The menu can be a single word, such as “contact”, or a series of words, such as “How to manage this page”. From the title, the web address (url) of the page is also automatically derived, which, when entered in the browser window, takes the user to the desired location.
Permalink – a permanent link is the part of the web page that the user enters to reach the desired address. For example, sinufirmanimi.ee/contact
Featured image – A featured image is displayed as a preview image when sharing a link on social media, for example, so it is always recommended to include a featured image on every page.
Pages can be created for different levels – the main page and its subpages. For example, if we have a page called “Employees”, it is possible to create subpages under this page, for example as departments ( sinuleht.ee/producers/accounting) or by name (sinuleht.ee/producers/jaan-juurikas).
You can manage the order of the contents on the public side .
Posts / News
Posts are content pages displayed in chronological order (newest post at the top), with posts having different topics under which they are grouped. It is also common for visitors to be able to comment on posts.
Add a new post
Like pages, posts can be added from the toolbar as well as from the main menu, using the quick menu.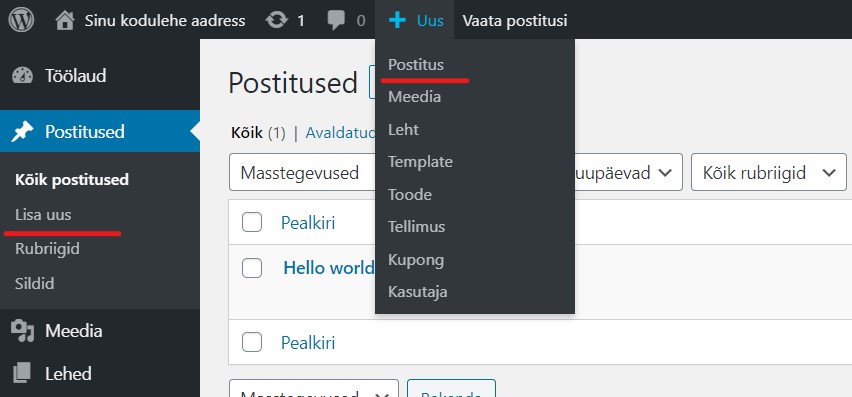
Title – the title is the title of the post, such as “How to manage a WordPress website” , and
Permalink – A Permalink is automatically generated from the page title. For a very long headline, it is also possible to shorten it.
Categories (Categories) – is for grouping posts under the same topic. Categories are also hierarchical and it is possible to create head and subcategories for example – Construction, wallpapering, painting etc.
Tags (Tag) to describe the details of your posts. Tags allow content to be micro-categorised. Labels are not hierarchical.
Featured image – Featured image of the post. This is most commonly displayed, for example, on a blog page as a tag image, where each post has its own illustrative image. The tag image is also used as a preview image on social media, for example when sharing a link, so it is always advisable to include an image with each post.
Pictures and other files
Media – all the images and other files on your website are collected together. Files in the media strategy can be filtered in both grid and list views. In addition, there are other filtering options in the media strategy (by file type, date, etc.).
Files can be added by dragging and dropping the required media files into the box on the screen. The maximum size of uploaded files is 2GB.
NB! It is ALWAYS important to reduce and resize the image to a web-friendly size before uploading. There are several ways to do this. I have described one possibility in this post
When you upload an image to a media feed, you can add a lot of information to the image. The most important of these is the name of the image – this should always include the name of your company and/or brand and the keyword you want the image to be found with. The name of the image should always be descriptive rather than just “image.jpg”.
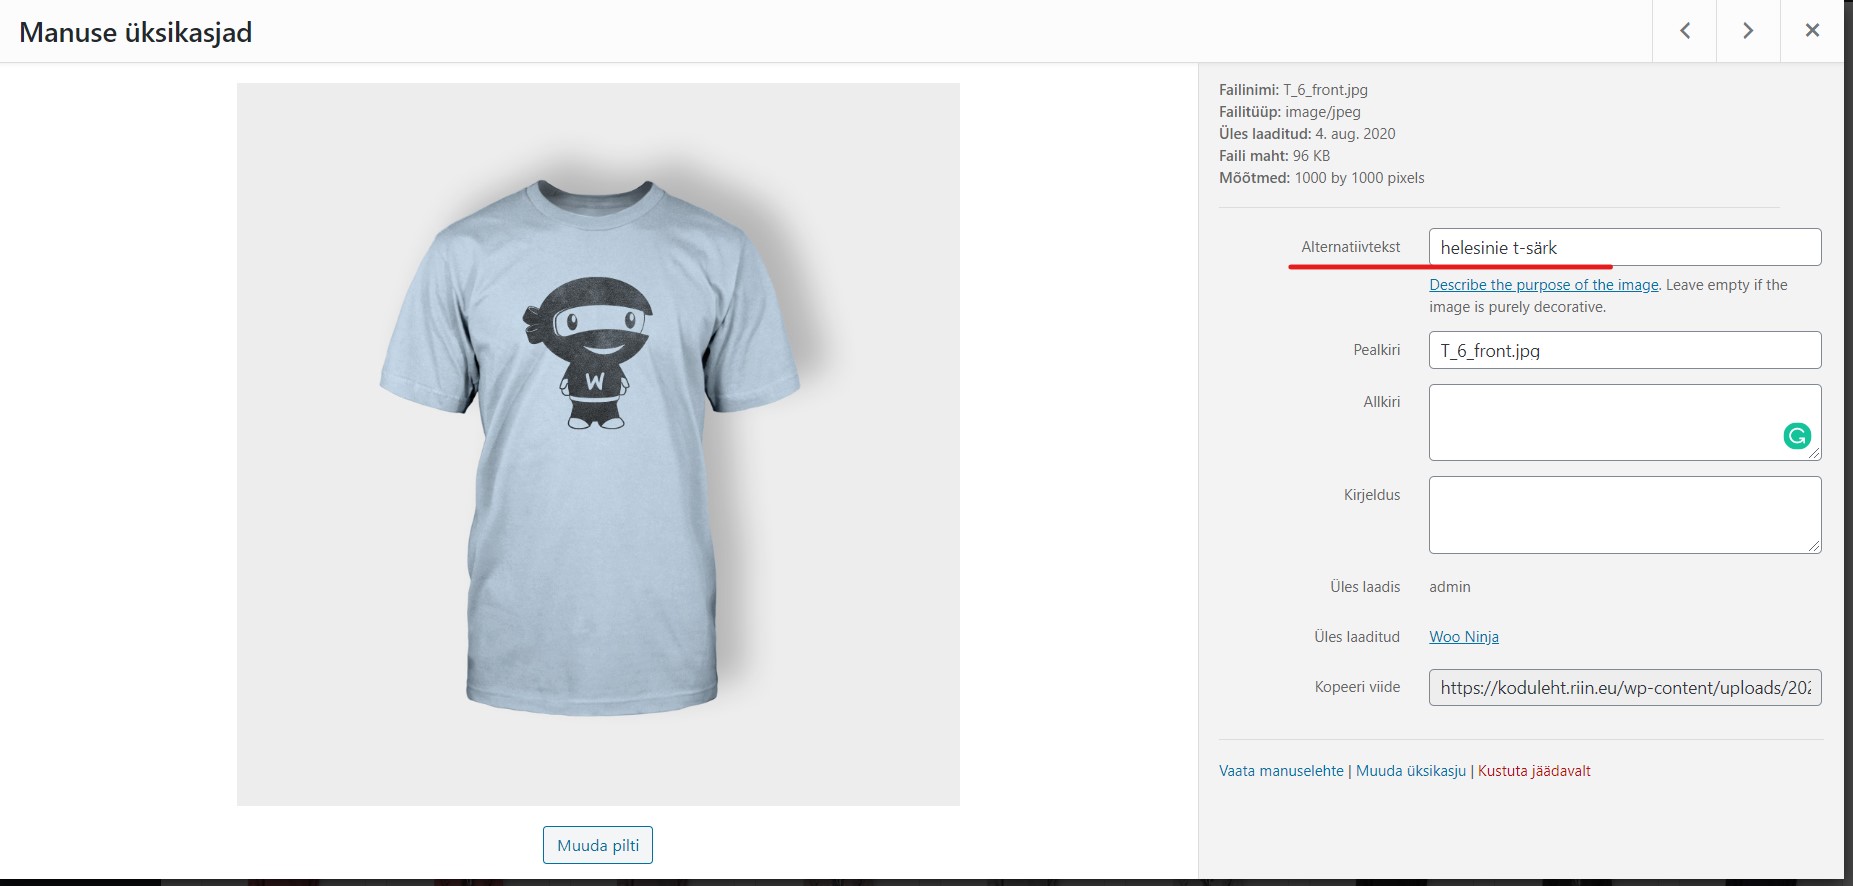
TIP! For SEO, it’s always important to include Alt text – which describes the image. For example, “A dog playing with a ball”
Adding an image to a post or page – To add an image to a page, select “Add media file” This will open a view of all the files that have been added to the homepage and are visible in the “Media” section.
If you wish, you can add a new file from your computer by selecting “add a media file”. In addition, it is possible to create Galleries
If the image you want to add to your homepage has already been added to your mediafeed, simply click on it. A blue box will appear around the selected image and a list of selected files will appear at the bottom left of the page. If everything is suitable, add an image to the page by clicking on “Add to page” The file will be added to the page at the position where the mouse cursor was.
If you want to change an image on the page, click on it to make a box appear around the image. You can align the image left, right and centre (the area in the blue box). Clicking on the “pen” button opens a separate box where you can further change the settings of the images (green box).
In addition, it is possible to resize the image using the boxes in the corners of the image – to resize, move the box and the image will resize accordingly.
Image settings
If you want, you can change the image settings as follows
Alignment – Align the image with the text
Size – Specifies the possible image sizes. In addition, you can select “Custom size” to choose the size that suits you. With a customised size, you decide the width and height. By changing the laziness or height of the image, it also proportionally changes the other value.
Link to address – You can choose what happens when you click on an image.
Media file – opens an image
Attachment page – opens the image in a separate window
Custom URL – the web address you specify
Missing – No reference has been added to the image. 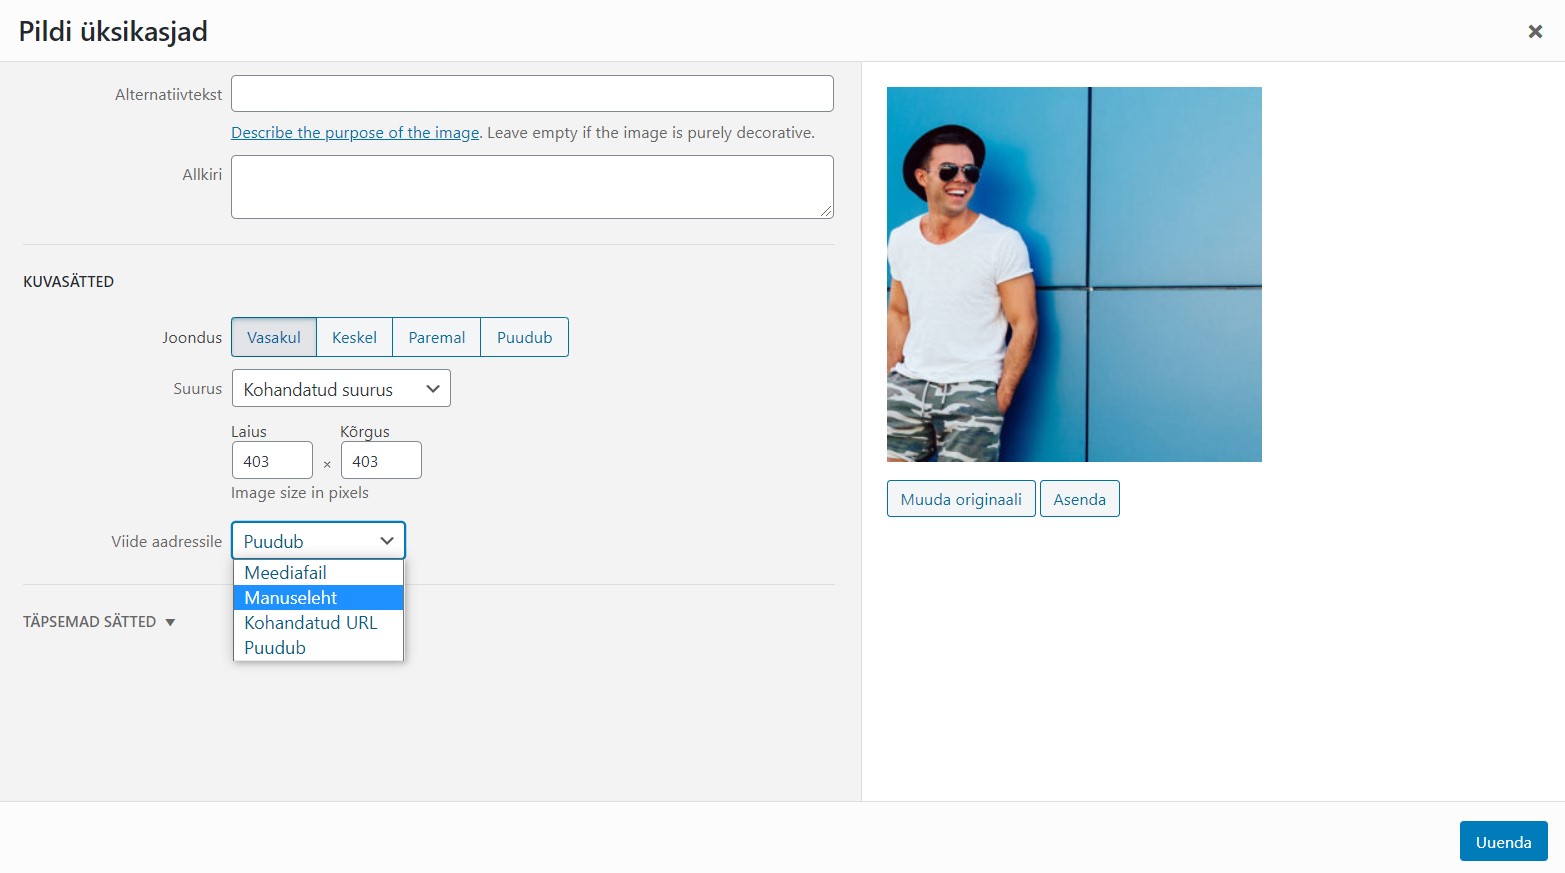
Menus
A Menu is a list of links that take the user to the important areas of a website. Usually, the menu of a website is displayed as a horizontal bar on each page. Menus can be quickly managed by logging in as administrator and selecting “edit menus” from the quick menu.

If you are already an admin, go to Appearance -> menu.
Depending on the design template of your website, it is possible to add several or one menu.
To add a new menu, enter the name of the menu and select “Create menu”. . After that, the advanced settings already open.
If a menu has already been added it can be easily changed. To do this, first select which menu you want to change from the drop-down menu.
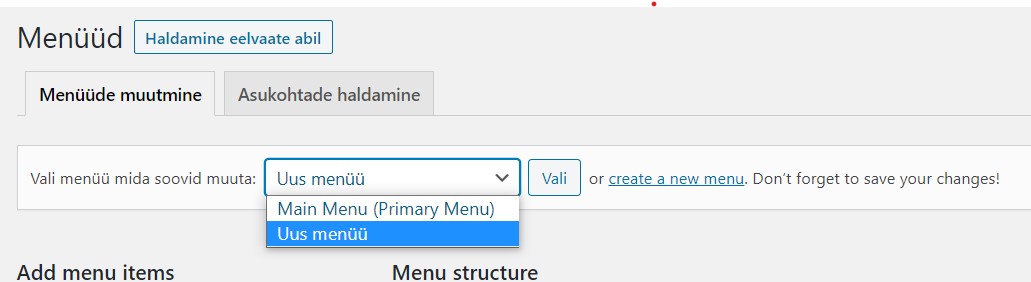
TIP – if you feel that some of the options for adding a menu are missing, go to “screen settings” and see if all the required boxes are ticked. For example, if there is no product category section – tick it and the options will appear.
Select which links you want to display in the menu, once selected click “Add to menu” If you wish, you can change the location of the menus by dragging them to the appropriate place.
In case you want to add a specific link to the menu, select “User links”, enter the desired address, title and add it to the menu.
 For a tiered menu, drag the desired submenu under the main menu – a layered display that gives the impression of a tiered menu.
To remove a menu, open the menu item you want to remove and select “Delete” Don’t forget to press “save” after each change.
User management
By default, WordPress has a number of user roles (Users) that determine what a user can and cannot do on a page.
Add a new user
To add a user, go to Users – add new.
First add his username. It is normal and safe for this to be the user’s e-mail address. This can also be a name or a combination of numbers.
Add an email address – this is the address to which the new user will be sent registration information and, if the password is lost, a link to recover it.
In the password section, it is possible to check the password on request. However, if the user receives a notification with account details, they can set a new password via the link in the same letter.
The role – this is the most important thing. With a role, you specify what rights the new user has on your page.
NB! Never share your data with others, always create a new user.
User roles
Administrator – this is the most powerful user role, which means that users with this role can do ANYTHING. In addition to publishing posts and pages, they can also add and remove new apps, templates, users, etc. The administrator is the superadmin of the website.
Editor– The user in the role of Editorhas full control over the content being managed. They will be able to add, edit, publish and delete any posts and pages; including those created by others. The editor can also moderate, edit and delete comments.
The editor does not have access to modify website settings, install plugins and themes, or add new users.
Author– As the name implies, users with author status can write, edit and publish their own posts. They can also delete your posts, even if they have been published.
When posting, authors cannot create categories, but they can choose between existing categories.
They do not have the rights to change page settings, plugins, or themes. Authors are fairly low-risk users – except for their ability to delete their posts, even if they have been published.
Contributors can add new posts and edit their own posts, but they cannot publish them. In addition, they will not be able to create new categories and will be able to choose from existing categories.
The biggest disadvantage of the contributor role is that they cannot upload files (which means they cannot add images to their article). They do not have access to settings, plug-ins or to change the design template.
The reader (Subscriber) can log in to WordPress, update their user profile. They can’t write posts, view comments, or do anything else in the admin area. This user role is particularly useful if you need to allow users to log in to a website before they can read a post or comment on a post.
WooCommerce roles
Shop manager – in addition to the rights of an editor, the shop manager has the right to manage orders and add, remove and edit products.
Kleint (Customer) – is a registered user of the e-shop, who has the right to view his/her orders, edit his/her data.
Depending on the functionality of your site, user roles may vary.
Website maintenance and updating
The designs and apps on the website need updating – just like the apps on your smartphone. The updates are necessary both to fix bugs detected and to improve functionality.
See https://riin.eu/juhe nd-kuidas-uuendada-wordpressi-lehte/
WooCommerce and e-shop
WooCommerce is a plug-in for the WordPress e-shop that allows you to turn a regular website into an e-shop. WooCommerce is probably the most popular way to create an online shop today.
WooCommerce add-ons can be managed in a similar way to posts, by categorising and tagging them. In addition, it is possible to add properties to products, which can in turn be filtered by.
Product categories
is intended to group products. Categories are hierarchical, and it is possible to create main and sub-categories; for example, Clothes – with skirts, blouses and trousers as sub-categories.
Product features
It is possible to add both globally per product, as well as for a specific product.
Product types
The product type determines what information can be added about the product and how it will be displayed in your e-shop.
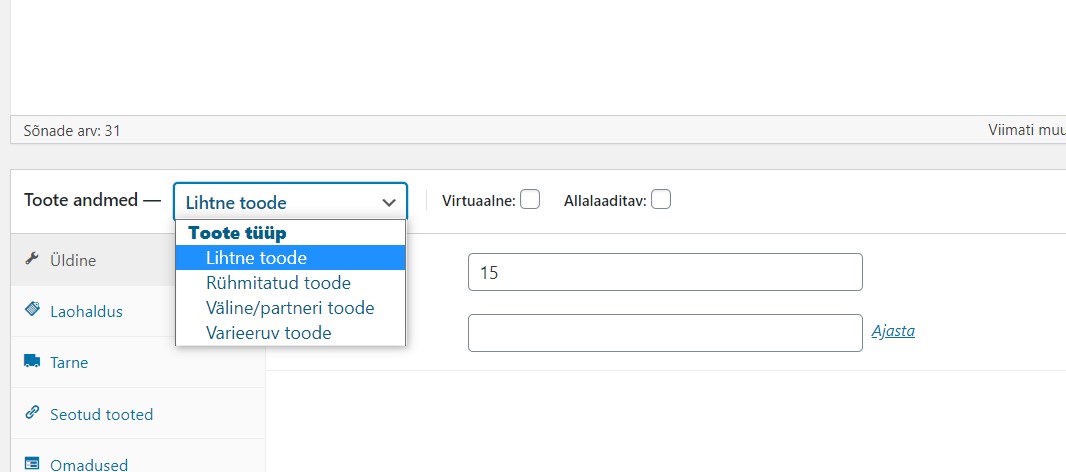
Simple – is a regular product that does not need to be selected to be added to the shopping cart. A simple product is a book, for example.
Virtual – Selecting virtual as the product type will automatically disable all delivery options. Having only a virtual product in the shopping cart will also not display the delivery calculator in the shopping cart and checkout page.
Downloadable – Selecting Downloadable as the product type will activate additional fields where you can enter both the downloadable file to be sold and additional information about the download limit. After a successful purchase, customers will receive a downloadable file as a link in their order notification email. It’s perfect for a digital album, a PDF magazine or a photo, for example.
Grouped product – is a set of products that can be purchased individually and consists only of simple products. For example, a set of six cups.
Variable product – is a group of products under which a product with different characteristics is grouped. For example, a t-shirt where the customer can choose the colour, the size, maybe even the material? Each product variation can have its own product code, price, batch, etc., similar to a simple product.
Adding a simple product
You can add a product as a quick selection from the toolbar and also from the main menu.
Add a product name – this will also be displayed in your shop and will generate the product’s web address and description.
Please add the product price to the product details , and a discounted price on request.
In Inventory Management, it is possible to add a product code (SKU) and specify whether the product stock is managed. By adding a tick to the product-specific stock management, you can set the amount of stock left and what happens when the product runs out of stock. If a product runs out of stock, it will be displayed on the page and customers will not be able to buy it.
In the delivery box, enter all the information about the weight and dimensions of the product package you are sending.
Related products – while products in the same category are traditionally displayed as related products on the product page, it is also possible to add products that are recommended instead of or in addition to this product.
Selecting Up-sells – these specific products will be displayed to the customer as a separate group on the product page.
Selecting Cross-sells – the products selected by the customer will be displayed in the shopping cart. It’s a great opportunity for additional sales
Adding a variable product
To add a variable product, it is advisable to start by adding properties. It is also possible to add properties from a specific product page, but then they are only valid for that product and are not global – i.e. they cannot be used for other products.
Go to products – features. Add a property name – this will automatically generate the url. Next, set up the terms/values – the attributes that differentiate the products. For example, if Colour is a property, then Red, Blue, Purple, etc. are terms. Same with size – Size is a property and S, M, L are terms.
Once the global properties are added, you can start adding variable products. Selecting Variable product from the Product details page will bring up an additional box called “Features”.
On the features page, it is possible to select the ones that the customer can use to choose the product. If you are dealing with a t-shirt with different colours and sizes, choose two different features. By selecting a property, you can set the values that this particular product has. For example, some t-shirts in your online shop may be red, while others may be red and black.
TIP! Values can be added directly from the product page. For example, if you need to add another value in addition to the ones you have already entered, you can conveniently add it to
If you want to make sure that the customer selects the appropriate value when ordering the product, tick the box “Used for variations”.
When all properties are selected go to the Variations page. All properties are added then there will be an option to “create variations of all combinations of properties” This will create a new variation/product for each possible combination of variation properties (up to 50 operating points). If the product has more possible combinations, run the same command again.
This creates all the variation in products. For example, if you used the properties Color and Size you will create product variations Red t-shirt size S, Red t-shirt size M, Red t-shirt size L etc.
You can then go on to add product details.
Variable product fields are similar to a simple product. You can add price, discount price, weight, dimensions, etc.
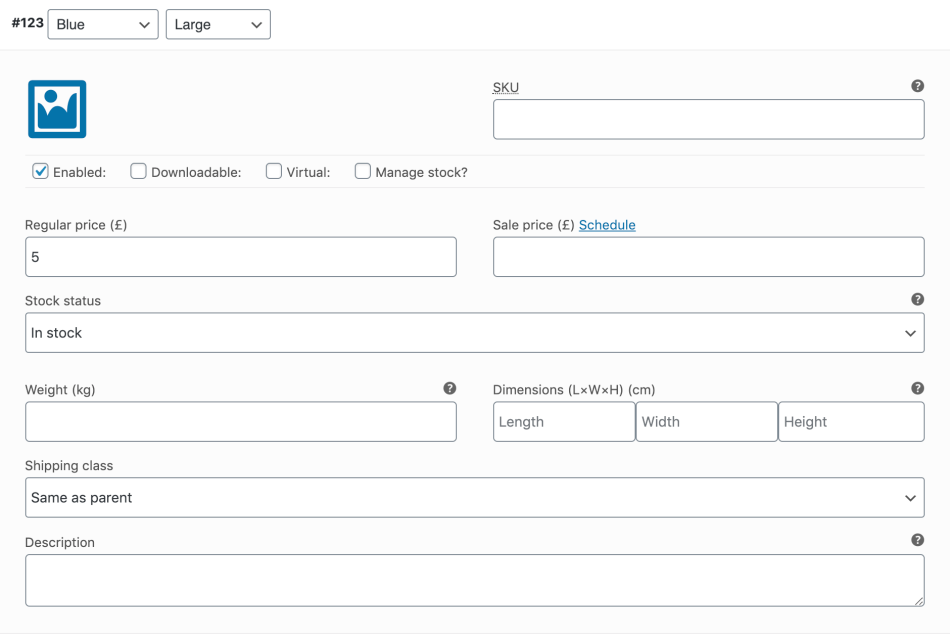
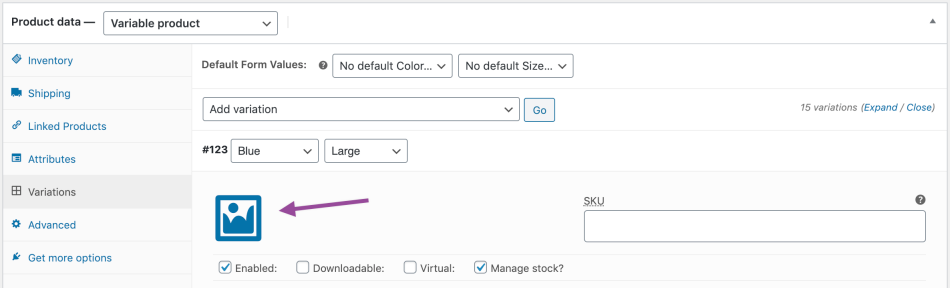
If you also want to manage a warehouse of variable products, you will need to enable this from the product details page.
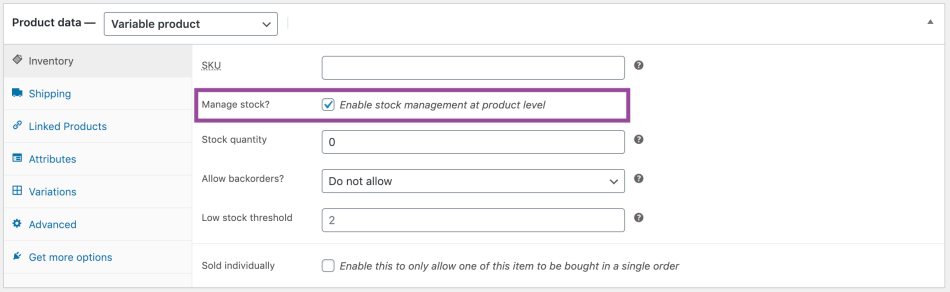
It is then possible to specify the quantity of stock, whether the product is on-demand, etc.
It is also possible to add an image to the product. As a result, the customer’s preview will change after he has made the choices to add the product to the shopping cart. This is especially true for products of different colours – selecting red blouse will display red blouse, selecting blue will display blue blouse, etc.
In addition, it is possible to change the values of variable products in bulk. For example, it is possible to set the price, weight, discount price, discount dates, etc. for all products.
Import and export of products
Products and all related information can be imported and exported. The guide can be found on the Woocommerce page.
Coupons and promotional code
Woocommerce itself has a perfectly respectable system for managing coupons and promotional codes. which you can use successfully
NB! In order to use coupons, it must be activated in the Wooocommerce general settings. To take advantage of coupons go to
- Go to : WooCommerce > Settings> General> Enable coupons ( Enable coupons)
- Tick Enable the use of coupon codes.
- Save.
Add a coupon
Go to: Marketing> Coupons.
Click “Add Coupon” to add a new coupon.
If you wish, you can add the appropriate code or click on the button “generate coupon code”.
The coupon code must be unique!
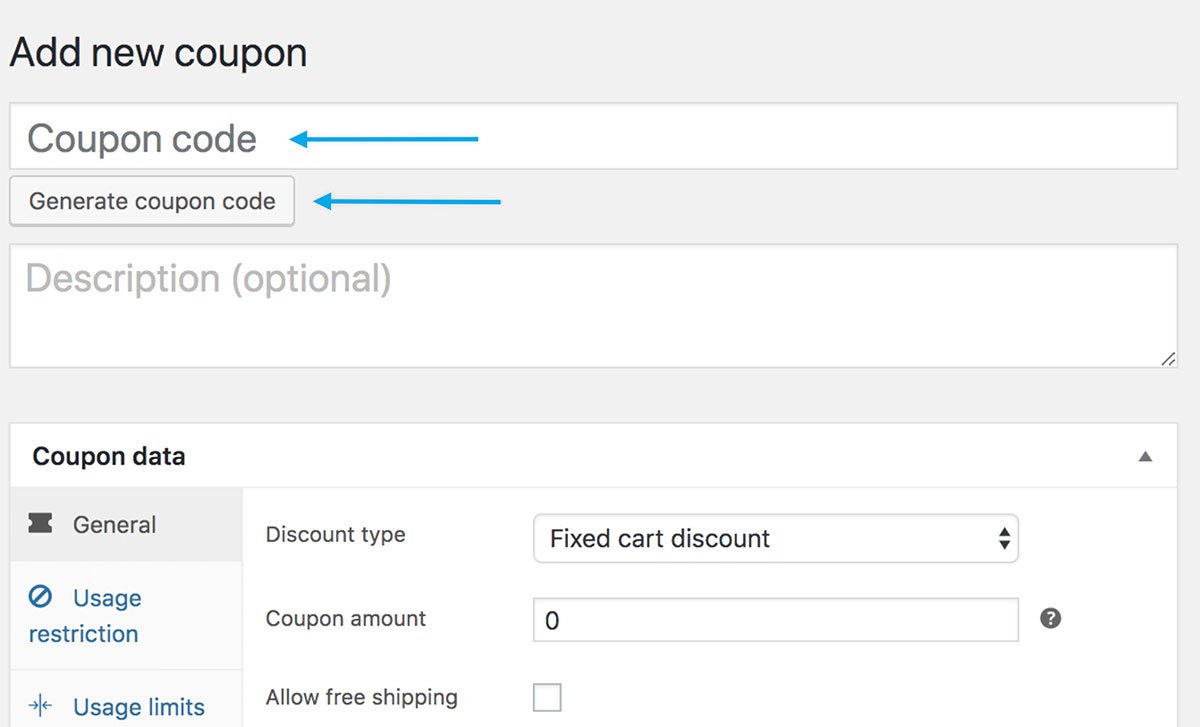
If you wish, you can also add a description of the voucher (Description), for example, information about the campaign, etc. Coupon description information is visible only to the administrators of the page.
On the Coupon details page, there are three sections where you can configure coupon restrictions:General, Usage Restriction,Usage Limits.
Types of discount:
- Percentage discount: percentage discount on selected products – for example 10% discount on selected products.
- Fixed shopping cart discount amount: a specific amount to be discounted from your shopping cart – for example, €5 off each order.
- Fixed product discount amount: fixed concrete discount amount for specific products – for example 5€ discount on a white t-shirt (eligible products will be selected).
Coupon value – the value of the coupon – a percentage or a specific amount – depending on the type of discount chosen.
Allow free delivery: the possibility to offer free delivery to your customers.
Coupon expiry date: the date from which the coupon can no longer be used. The coupon expires on this date at 00:00.
Restrictions on the use of the coupon
- Minimum amount – allows you to set a minimum amount in the shopping cart for dipping a coupon
- Maximum cost – set the maximum cost to use the voucher.
- For individual use only – tick here if this coupon can only be used for individual use. Coupon discounts cannot then be combined with each other
- Exclude discounted products – Tick the box to exclude products that are already discounted.
- Products – Select specific products to which the discount applies
- Exclude products – Select products for which the discount is NOT APPLICABLE
- Product categories – select the product categories to which the discount applies
- Allowed email addresses – enter the email addresses to which the specific discount applies. NOTE: by using (*) you can add specific emails to the discount. For example, *@gmail.com gives a discount to all gmail.com addresses.
NB! LEAVING “PRODUCTS” AND “EXCLUDE PRODUCTS” BLANK WILL APPLY TO ALL PRODUCTS SOLD IN THE E-SHOP.
Coupon usage limits
- Limit per voucher – How many times this voucher can be used before it expires – leave blank for unlimited use.
- Limit per user – The number of times an individual customer can use this coupon. For guests, the billing email address is checked and for logged in users, the user ID is checked. Leave blank for unlimited use.
Order management
Orders are purchases made by your customers. Orders can only be managed by administrators and users in admin roles.
Order statuses(Status)- changes according to where the customer is in the buying process.
Pending payment – order accepted, payment not initiated. Pending payment (outstanding). Nowadays, payment channels are used (in Estonia, for example, Maksekeskus) which process the payment instantly and it is not possible to see the status.
Cancelled (Failed) – payment failed or rejected (unpaid) or requires further authentication. It is important to note that this status may not appear immediately and will instead be displayed as “Pending” until the payment is confirmed (e.g. PayPal).
In Processing – Payment has been received, stock has been reduced by the quantity purchased; the order is waiting to be fulfilled. All product orders require processing, except those containing only products that are both virtual and downloadable.
Completed – a fulfilled and completed order – requires no further action.
On hold – the payment is pending – the stock is reduced and the payment must be confirmed manually. For example, in the case of a manual transfer.
Cancelled – Cancelled by the store manager or customer – the stock will be increased by the amount in the cart, no further action is required.
Refunded – Refunded by the store administrator – no further action is required.

Orders are visible in the Woocommerce – Orders menu. The order list can be sorted and filtered for the data you want. In addition, it is possible to preview the order.
On the order page, you can also see all the notifications (or notes) associated with the order, including when you placed the order, when it was paid, when it was marked as completed, etc.
Notifications to customer and store manager
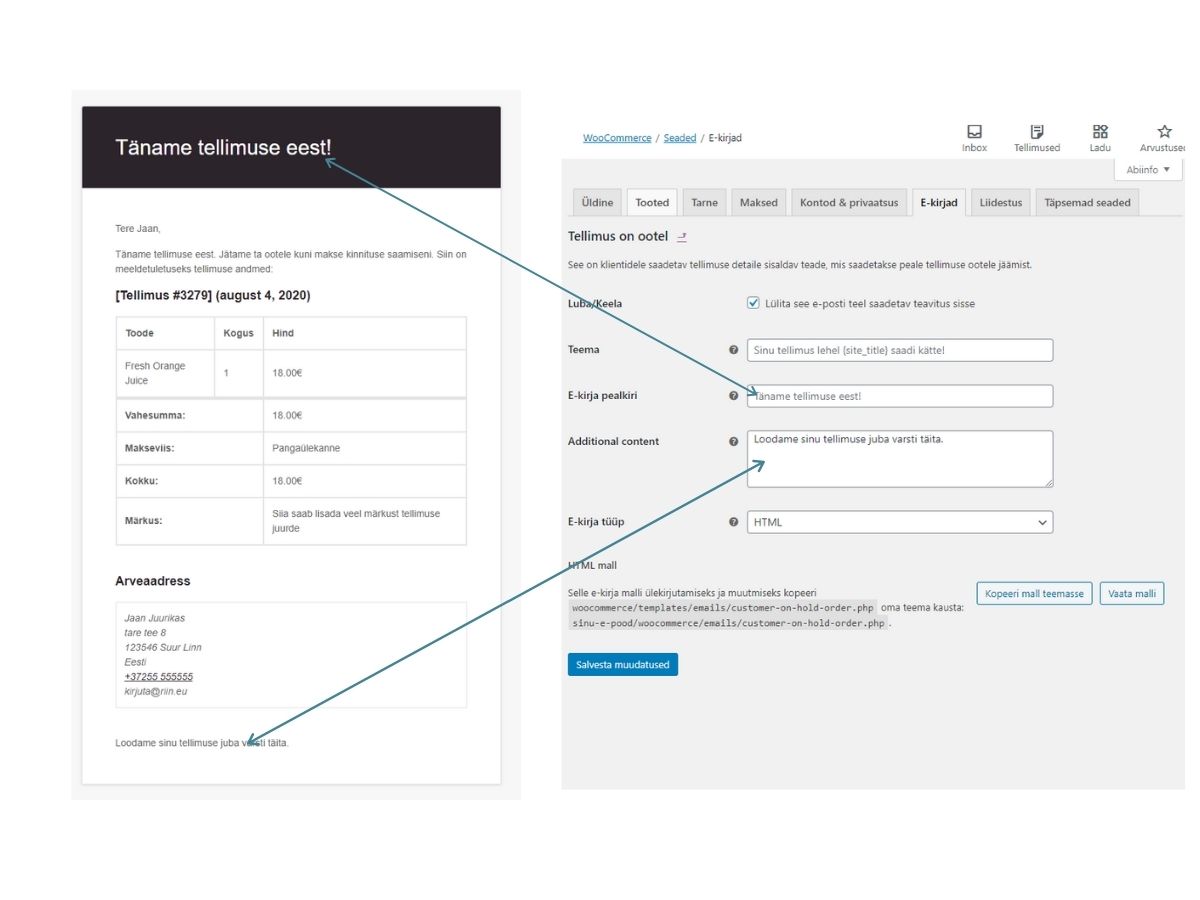
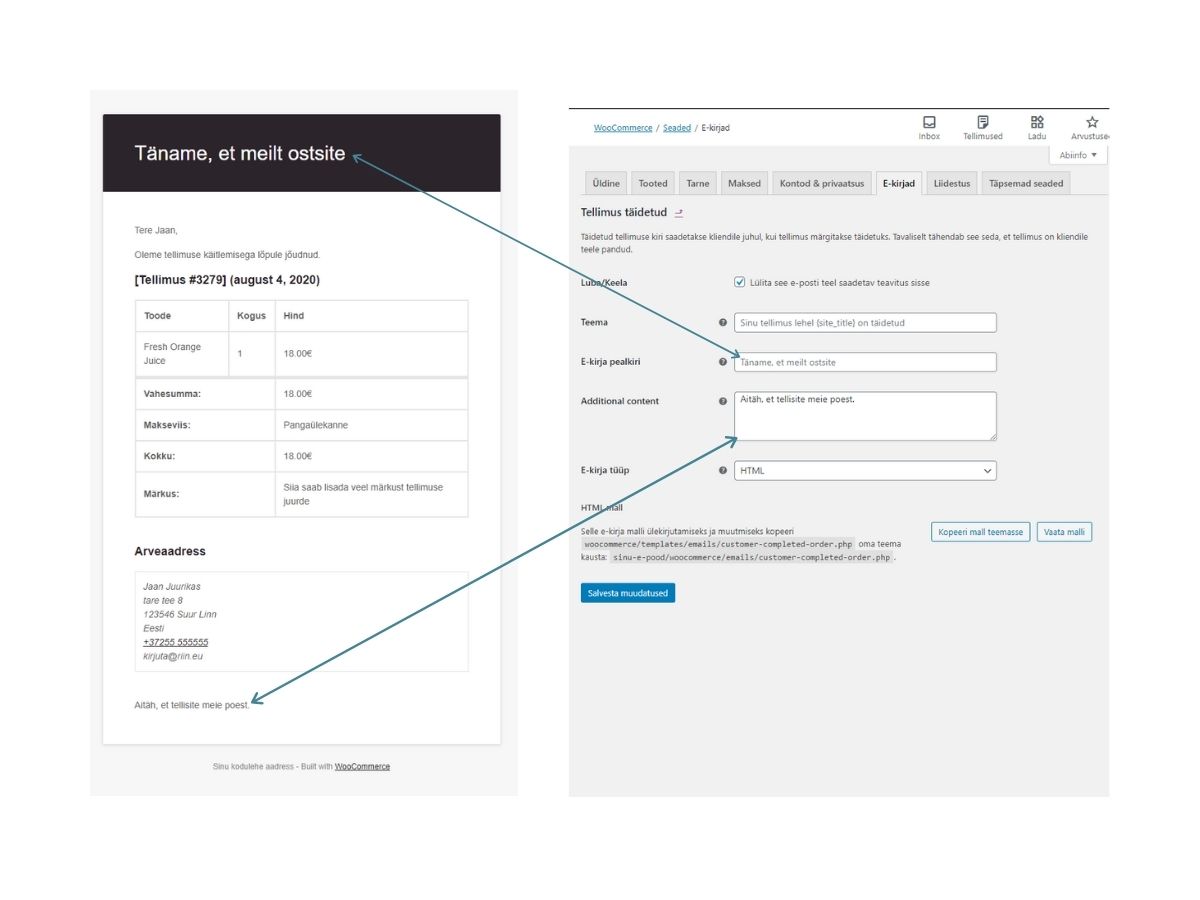
Which emails go to the customer can be managed in WooCommerce-> Settings -> Emails
On this page it is possible to activate and deactivate the notifications to be sent.
I will also provide examples of the letters that will be sent to both the customer who placed the order and the store manager. The content of the letter can be changed by the web administrator – just send him the information you want.
Sample e-mail to the store manager about a new order

Sample e-mail to a customer about a new order
Sample e-mail to the Customer about a completed order
Data used in the WordPress Administration Guide
https://www.wpbeginner.com/beginners-guide/
https://docs.woocommerce.com/documentation/plugins/woocommerce/getting-started/