What’s the No. 1 thing to do after registering a domain and subscribing to a server service?
Congratulations! You’re already, or at least planning to start a business, and of course it’s important to register your own business domain. After registering your domain, the first thing you should do is to create an email address for your company, which you will use to manage your company’s affairs. While it is popular among small businesses to use a Gmail account, it is still more reliable to use an email address with your business domain. This will increase your company’s professionalism and credibility in the eyes of your customers and partners.
Here are step-by-step instructions on how to set up an email account in the Zone and WebMajutus environments. Both of them are the largest web hosting providers in Estonia today.
Creating an email account in Zone
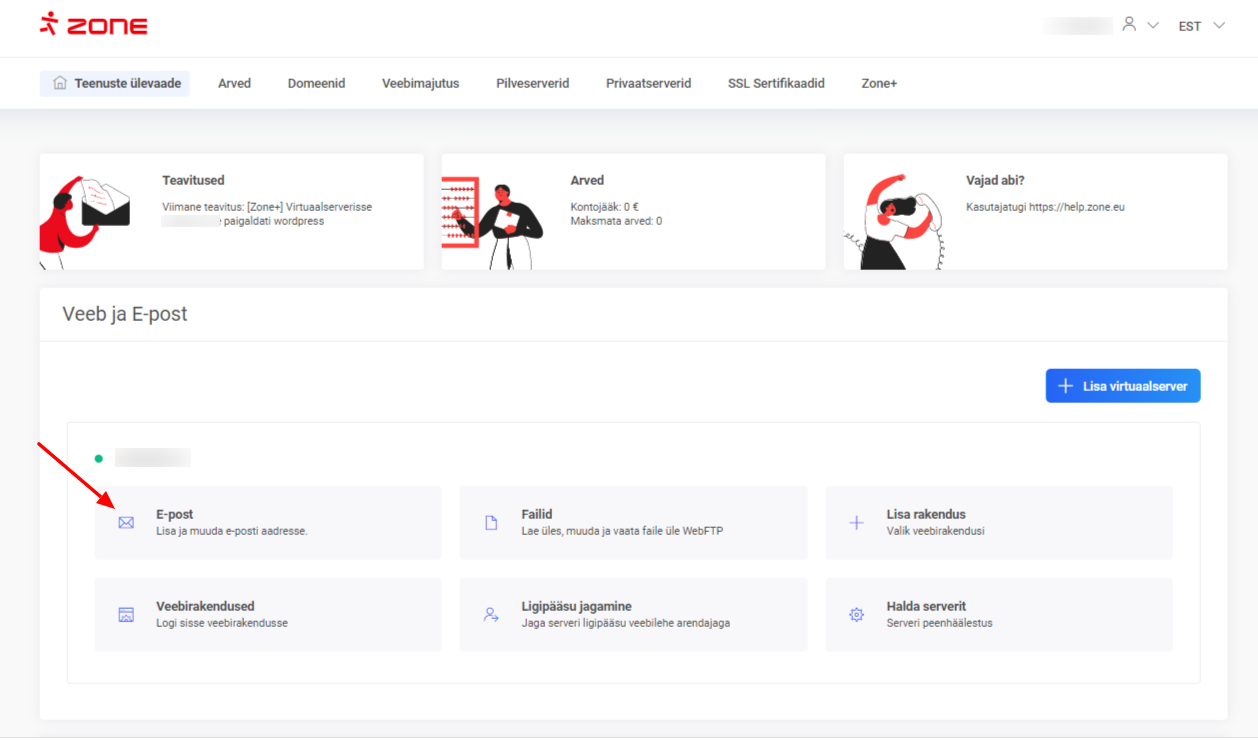
- Sign in: Go to Zone self-service by logging in with your username and password.
- Choose Domain: open your domain list and select the domain you want to add an email address to.
- Add Email: go to the “Email” section and select “Add new account”.
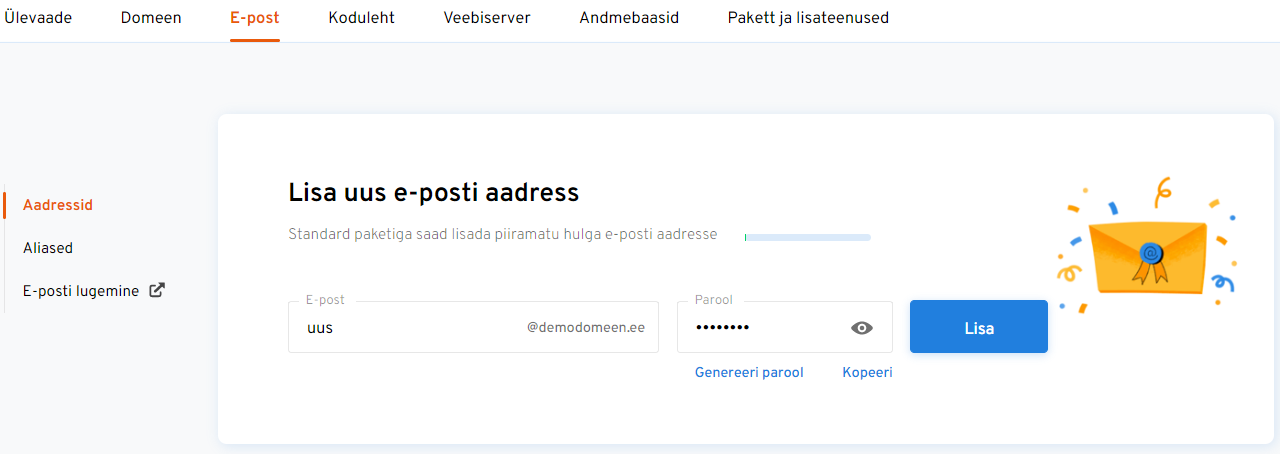
- Enter your details: enter the email address and password you want. Enter your email address, enter your email address, enter your email address, enter your email address, enter your password.
- Save: Confirm your changes by clicking “Save”. Click ‘Save’ to confirm your changes. Your email account is now set up and ready to use.
You can start using the email account you have created immediately via the webmail at: https://webmail.ee
Instructions on how to add a mailbox to your email programmes can be found here.
You can find more detailed instructions and visual aids at the Zone Help Centre.
Creating an email account in the WebMajutus environment
- Log in: open the Veebimajutus.ee self-service and log in with your account.
- Choose Domain: choose the domain you want to associate the email address with.
- Go to the E-mail Addresses section: From the self-service menu, select “Email” and then “Addresses”.
- Enter your details: enter a new email address and choose a secure password. Enter your new email address, enter your new email address, enter your new password, and follow the security requirements when choosing your password to avoid potential security risks for your account.
- Save: Confirm the e-mail address you have created by clicking on the “Save” button. Click “Save” button to confirm the email address you created.
A more detailed guide with step-by-step explanations is available in the FAQ section of the Web Hosting FAQ.
More information about the e-mail options of Veebimajutus can be found here.
Why use email with your own domain?
As mentioned before, the biggest advantage is professionalism and reliability! In fact, anyone can create a Gmail address with your business name! But only YOU manage the emails associated with your domain!
- Professionalism: customers and partners will take you more seriously if you use an email address with your own domain (for example info@ettevõtte.ee) compared to generic free service addresses (for exampleettevõ).
- Trustworthiness: using your own domain shows that you are a credible company, which increases customer trust.
- Security and Control: an email address with your own domain gives you more control and security over your communications. You can manage the security settings on your server and better protect your data.
Creating an email address is the first and most important step after registering your domain and subscribing to a server service. The instructions in the Zone and Webmage environments are simple and user-friendly. By taking the time to set up an email address with your domain, you are investing in the credibility and professionalism of your business.
In cooperation with Zone and Veebimajutusega I can also offer you a cheaper server service!
See the Zone offer here and find the Veebimajutus promo code here.